Friday 28 June 2013

Week 26 Challenge - Animals

Welcome to another Polkadoodle challenge!  I'm not sure what is going on with the weather - its more like autumn and not summer!  However we have some fab samples to show you for our new challenge - and you know the drill - when the weather is naff, stay inside and craft!

But before we go onto this week's challenge we need to announce the top three from Week 24 Challenge which was a Male Theme.  The top three as chosen by the Design Team are (which was a difficult choice just to pick a top three!):

1st Place - Jane - you win a download bundle- please use the code PD1W2624 to claim your prize
2nd Place - Debbie
- you win a download bundle - please use the code PD2W2624
3rd Place - Debbie Simpson - you win a download bundle - please use the code PD3W2624


Congratulations to you all.  Please email Nikky and don't forget to quote your winners code - we cannot release prizes without it!  Blinkies are in the sidebar for you to grab.

We have a few little rules which makes our life a lot easier when we come visiting your blog:

1.  Please follow the challenge theme!
2.  Only enter your creation into a maximum of 10 challenges including Polkadoodles
3.  Please link your blog post and not your blog address with the linky tool - this saves us from searching your blog for your entry
4.  And please, no back-linking to previous posts - these will be disregarded from our top three voting
5.  If you have word verification on your blog it really does slow us down when leaving comments - please consider turning off word verification especially as the comment moderation has a spam section.


Right, onto the challenge for this week and the theme is:


Animals

Please don't forget our rules and good luck - the challenge ends on Sunday 7 July at 12noon GMT! 


Ruth:  I've gone for an old favourite - Paper Boutique Vol 3 and used the Buster template at A5 to create my card.  It's so easy - just print off all the elements, cut out and layer up!  There are also little extras but I've not used them and you also have a blue option and can make it either female or male!  All I've added are wobbly eyes and glossy accents on the nose!


Anjie For my card this week I have used an image and papers from the Double Sprinkles of Kraft CD
The papers and image are matted onto Kraft card and I have used a few Marianne D die cuts.

Kim -  Been having a play with the fabulous new BonBon Belles!  And there is the cutest little fox on the cd and I couldn't resist using him! I've used a couple of images, fence and flowers, etc., in a graphics program and the backing papers are also from the gorgeous selection on the cd


Lizzie For my card I used the new Bonbon Belles CD! Ooh its sooooo lovely!! I made the card from my dies, used a Martha Stewart Punch, Marianne Dies for the swirl and leaves. The flowers, paper and image are from the CD. I cut out the flowers and then cut the inner out and layered up after curling them over. I glittered up the Owls wings and skirt with my Stickles and added gemsHope you like it!!


I also made this CAS card from Bonbon Belles CD. I used my promarkers to colour the grass but everything else is off the CD!! I just love the sentiment!


JAN:  I used the 'Sugarplum Daisy CD' to create a card using the little hedgehogs - they are so cute. I coloured them with my Promarkers and added them to layers of paper, also from the same CD.


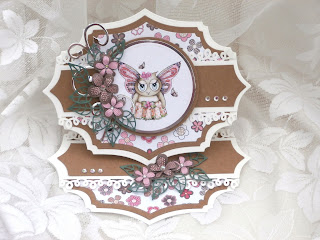
Nikky - I've stretched the theme of animals a little to include insects LOL...in fact Butterfly wings on my Bonbon Belle haha. Serves me right for not reading the challenge properly! Hope you like it! You can see how I made it over on my blog...

Shell - For my card this week I have used the cute married bunnies from the Cherry Blossom Lane CD I have cut the card blank on my cameo, added some pearls and lace and then coloured the image with copics and promarkers.


Good luck with the challenge and don't forget our rules - closing date is 12noon GMT Sunday 7 July.

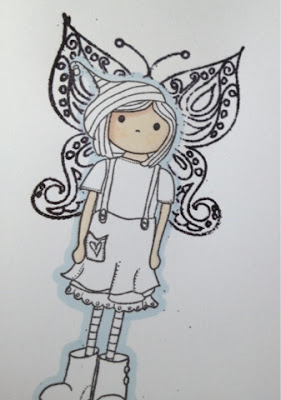
Tutorial Fairy Wings

   Hi everyone!  I think some people struggle with masking so for my first tutorial I thought I'd do it for you step by step.


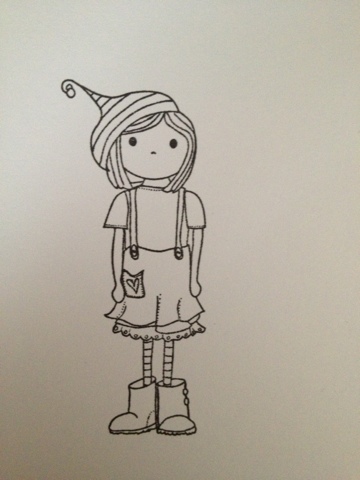
1. I stamped out the Bevvieboo image.


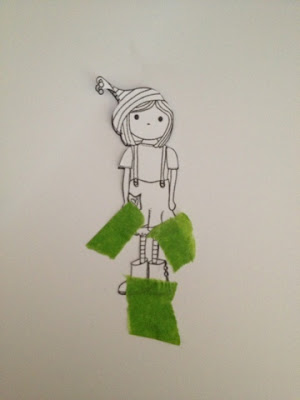
2. I stamped out the same image again and cut it out to make a mask.


3. I then laid one image over the top of the other and taped into place with removable tape (avoiding the wing area).


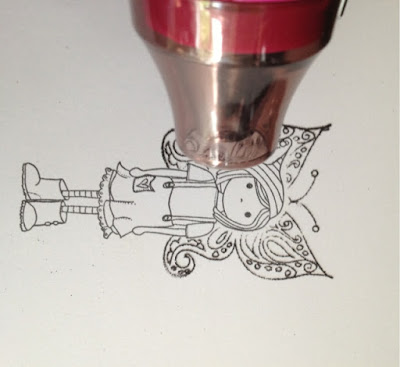
4. I then took the butterfly stamp and worked out where I needed to stamp it. I then stamped it with clear embossing ink.


5. Next step is to add black embossing powder then carefully remove the mask.


6. I then heated up the black embossing powder.


7. I drew a blue line around Bevvieboo to make her stand out then coloured my image and put the card together.


I think sometimes the simple techniques are the best so I hope you enjoyed this little tutorial.

love Bev x


Thursday 27 June 2013

Altered Mirror Tutorial

Good Morning Fellow Crafters

Today it is my turn to do a tutorial for Polkadoodles.  I decided to do something different and went with altering a mirror using papers, embellishments and frame from the Picknix 1 Hybrid Digital Papercraft Collection.

Here is my tutorial, I hope you like it.


Mirror, backing papers from CD, lace, ribbon, buttons, charms, PVA Glue and Mod Podge


Covered the mirror with the backing paper and made a frame for the mirror using All Sewn Up items on the CD.


Next I added ribbon which I ruffled down the joins top and bottom.


I added a journalling tag and added text and then added lace along the bottom.


To finish off I have added buttons to the four corners of the frame, buttons down one side, scissor and sewing machine and a heart button.

I enjoyed making this and I hope you have a go at altering a mirror.

Happy Crafting
Linda xxx

Tuesday 25 June 2013

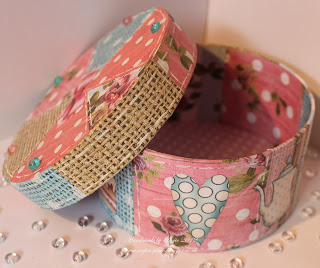
Altered box

Hello all, it's Anjie here today with a Studio 12 post.
I've got lots of costume jewellery and bangles that were in desperate need of a nice home, so I bought some paper mache boxes and got busy. The papers and embellishments are all from the fabulous Studio 12 CD-rom Picknix Collection 1. For the sides and the inside I cut the papers into squares and glued them in place. For the lid I cut the papers into triangles and stuck in place. I then cut out all the embellies and added them. I finished it off by adding some faux stitching.

Now I am going to know straight away where all my bracelets and bangles are!

Sunday 23 June 2013

Flowers Feed The Soul

Good Morning,

I do hope that everyone is having a great weekend. JAN here today to show you a little something using the Picknix 1 CD. I must admit I had a little panic when I realised it was my turn to post and the colour cartridge had ran out in my printer! So into my scraps I went and this is what I came up with ...


I printed the sentiment onto a piece of white card then added the little hexagons which I stamped and cut out of scraps of paper left over from a previous project! A little bit of distress ink and some added flowers to finish off. A really quick and simple card!

Hugz, Jan xx

Friday 21 June 2013

Tutorial: Mini Pop-Up Cards

Hello, fellow crafters! It's my turn to host a Polka Doodles Tutorial and I'm going to show you how to make an easy peasy mini pop-up card.  So incredibly simple you'll be churning these out in no time at all. The finished project looks like this:

Cute little owl with a birthday greeting on the outside ...

.. and another cute little owl pops up on the inside!

Here's how to make this adorable project:

1.  Get an image. I'm using this cute little owl from Polka Doodles Sugar Birdies CD and it measures 1-3/4" wide and 1-7/8"up to his eyes (2-3/4" all the way to the top).  You need to measure your image because the pop-up mechanism has to be smaller than the image so that it's not visible.


2.   Prepare the card base. I'm using heavy base weight CS to make a 4"x4" card.


3.   Make the pop-up mechanism. Based on the size of my image I cut a piece of layering weight card stock measuring 1-1/4" x 5". On the long side, I scored and folded at the following marks on my ScorePal: 3/4"; 2-1/4"; 3" and  4-1/5". ( Each section measures 3/4", 1-1/2",  3/4", 1-1/2" and 1/2").  


4.   The 1/2" section at the end is the glue tab. Apply some adhesive tape here.


5.   Fold over and glue the tab to the top edge of the strip of card stock. You should have a box without sides.


6.   Apply some glue to the wide surface of the pop-up mechanism and attach it to the pop-up image. You should not be able to see the pop-up mechanism from the front of the image.


7.   Now you're ready to attach the image to the card base. If you want to decorate the inside of your card make sure you do it before you attach the pop-up image. First, apply some glue to the base section of the pop-up image and adhere to the centre inside of the base card. Then push the image flat against the base card, apply glue to the section that will be against the base card (as shown below). Close the base card down on top of the pop-up image. Let the glue dry before opening.


8.   Once the glue has dried, open the card and voila! You have a 90º equal parallel pop-up card.


It really is that simple!  Just 2 little details to bear in mind:
a)  the pop-up mechanism (the "box" behind the image) must be a little smaller than the image itself; and
b) the base card must be big enough to fit the image when it's folded down flat.


Here's another pop-up card, also using an image from the Sugar Birdies CD.

This card measures 4-1/2" x 3-1/2" ...
.. and there's that little pop-up owl. Fabulous birthday surprise!

The Sugar Birdies CD is full of cute elements that you can use to churn out quite a few of these dinky little pop-up cards. I hope you'll give it a go, it really is hoot to make! (Sorry... I couldn't help myself! LOL).

Happy crafting!


Beijinhos,

Week 25 - Summer Birthday

Hello and welcome to another challenge at Polka Doodles!

This week is rather special as we have 3 new DT members joining us and we'd like to give a very big welcome to Bev, Claire C and Linda who are sharing their first creations with us today. Be sure to check out their cards and go and leave them some appreciation if you can.

But before we go onto this week's challenge we need to announce the top three from Week 23 Challenge which was to create a Birthday Card With Scraps.  Some really fabulous creations were entered but there can only be three lucky winners and they are:

1st Place - Sarah JW - you win a Download Bundle - please use the code PD1W2523 to claim your prize
2nd Place - Lisa Barton - you also win a Download Bundle - please use the code PD1W2523 to claim your prize

3rd Place - Julie B - you also win a Download Bundle - please use the code PD1W2523 to claim your prize
 

Congratulations to you all. Please all email Nikky and don't forget to quote your winner's code - we cannot release prizes without it!  Blinkies are in the sidebar for you to grab.

We have a few little rules which makes our life a lot easier when we come visiting your blog:

1.  Please follow the challenge theme!
2.  Only enter your creation into a maximum of 10 challenges including Polkadoodles
3.  Please link your blog post and not your blog address with the linky tool - this saves us from searching your blog for your entry
4.  And please, no back-linking to previous posts - these will be disregarded from our top three voting
5.  If you have word verification on your blog it really does slow us down when leaving comments - please consider turning off word verification especially as the comment moderation has a spam section.


Now for our challenge for this week and the theme is to create:
 
A Summer Birthday Card 
Please don't forget our rules and good luck - the challenge ends on Sunday 30 June at 12noon GMT!


Asha - For my summer card, I used an image that reminded me of summer from days gone by. As kids my sister and I used to set up a lemonade stand. This image is from the PickNix Collection 1 and I coloured it with alcohol markers. The  background paper is from the All Around And Everywhere CD. And to finish I have some simple embellishments: brads and red gingham ribbon.


Sally - Hi there, well this week's challenge is Summer Birthdays.  I thought I would make something that reminded me of summer - Strawberry Jam! I love Strawberry Jam.  I can't actually put some Strawberry Jam on the Challenge, but I have made a card instead!  I cut a piece of acetate 10 x 5, scored it in half, cut the shape of a the jar lid, rounded the corners to make it look more jar shape.
Printed off some dotty paper from the Bonbon Belle CD Rom in the lime section, and also printed off some strawberries in the embellishment section. Edged the dotty paper using a punch, covered the top of the card, wrapped some dotty ribbon around the top, cut out two labels using a Just Rite die, added a sentiment, cut out the strawberries and adhered them to the front and inside the card. Voila!


Fliss - Nothing says Summer to me more than flowers and I decided on a shaped card for this theme using a large scalloped circle die to create the pretty stand up card front, making the whole card from just one 8x8 card blank. I covered the base card with a scrap of paper from the Sugarplum Daisy CD and printed out the gorgeous floral topper from the CD and die cut this into a circle to add to my scalloped panel. I printed out some butterfly digis from the CD together with the lovely Poppy from the Fredericka CD and coloured the images with Promarkers.


Bev - For my first DT challenge I used the Cherryblossom Lane CD using blue & green papers to create the background. I added one of the tree embellies, used the fence border then added my main image which I coloured with Promarkers. Made a few roses to go in the basket and punched out a few more flowers & added my inked, ticket greeting all from one cd!


Linda - I have used Picknix Hybrid Digital Papercraft Collection.  I used the papers, embellishments and sentiments from the Heavenly Garden feature on the CD.  I built up my scene and printed off and mounted it onto pale blue pearlescent card.  I then printed off some of the flowers and cut them out and placed on bottom of the card for dimension.  I then added 2 flower buttons to the top corners.  I made an easel card.  For the base of the card I printed of an 8 x 8 backing paper and added a sentiment.  Wrapped lace around the card before layering onto the card.  I then added a couple of flower buttons and a heart button.


Karon - This week I needed a postage friendly card, as I am posting a birthday to the UK from Canada.   I chose papers and the heart frame from the Studio 12 Picknix Collection 1 CD.  The papers on this CD are fabulous and the burlap paper looks so real.  For the heart frame, I printed it off twice and then layered it up, slightly rotating the top frame.  The sentiment is from the Cherryblossom Lane CD and I merged it onto the heart frame.  A little bit of ribbon to finish off.


Claire C I've used Cherryblossom Lane for my card, I love this cd, it really captured the feeling of summer for me. I've coloured the image with Graph'it markers and promarkers and inked the edges. The papers and sentiment are from the same cd too


Alethea - I found this challenge a bit of a challenge - perhaps because it is winter here so the weather is pretty uninspiring! Anyway, I decided to have a look at the Sundae of Seasons Cd and looked in the summer section and this is what I came up with... I duplicated the image so I could give it some depth by putting some of the flowers on foam dots. I just die cut out the image, inked around it and used some washing tape underneath it for a bit of colour. The sentiment is from the All Around and Everywhere CD. I added some dew drops to finish it off!


Miria For my summer birthday card I chose a light blue and yellow colour combo on a kraft background. The coloured stampie and paper are from A Double Sprinkle of Kraft and the sentiment is from Candy Doodles Collectors' edition. I just added some washi tape to finish it off.


Lidia And for this challenge I used the stamp Meeshelle. I really love the fairy and made a clean and simple card. I made my own background design with the flowers and painted with acrylics.


Fabulous inspiration I'm sure you'll agree and now it's your turn! You have until 12 noon GMT on Sunday 30 June to enter and good luck!

.......................................................................................


Thursday 20 June 2013

Purple dreams

Hello everyone It's Dee here with a dream box.  Well technically its not a box but a set of drawers but Dreams drawers just doesn't sound as good does it?  It started life as a paper mache piece, I painted it with blue, purple, pearl and green metallic acrylic paints and then over stamped using Staz-on inks in blues and purple.  Now I'm likely to get my wrists slapped by the boss lady, but I've been waiting to show you this for months and I just cant wait any longer, so if you keep quiet about it she may not notice!  The stamps I used are all Studio 12 stamps and I'm really, really sorry for teasing you all as they are out of stock at the moment, but they will be back soon, so keep checking for them.  They are perfect for just about any projects you'd want to do, journaling and altered art especially.  Which reminds me, have you seen the gorgeous stash in the Alterables section of the Polkadoodles shop, I have my eye on the cute house and the birdhouse, they are adorable and I have it all planned out in my head what I'll do with them.
I hope you can forgive me for teasing you, but I have been dieing to show it to you.