Hello everyone, Rebekah here with a little photo tutorial of a Tea light card I made using some of the stunning papers and digis from the Dolly daydream collection at Polkadoodles.
Here is my finished product..
Both my papers and image are from the exclusive add ons you get when you buy the CD through Create and Craft TV. I just adore this sweet image that I have coloured with my prisma pencils.
So here is how I made this...
You will need a piece of cardstock 16cm by 30 cms and score in straight lines at 1cm, 3cm, 7cm, 9cm and 21.5cm as indicated in the picture, making the last piece 8,5cm long
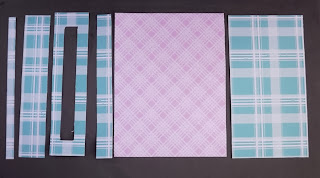
In the 4cm gap you want to cut a whole 1cm wide by 12cm long as central as you can get it, this will be your tea light window.
You will then need to cut pieces of patterned paper to decorate. I tend to cut mine slightly smaller so I can have a border and the big piece will be the inside of your card so if you want to make it a different colour (like I have done) then you can. You also don't need to cut the tiny 1cm strip like I have as this will be folded under and not seen.
You want to stick on your pieces as indicated making sure the bigger piece is for the other side unless you want to decorate all the sides.
Here is the inside of my card
I tape some double sided tape to the icm strip and fold at all the scored edges. If you fold the main card inwards it gives you a good line to know where to stick your tea light holder edge.
You can decorate the inside and add a piece for writing on and when you add your tea lights (it will take 4) then pop a ribbon around to keep them held in tightly.
And then you can decorate the front flap of your card.
I hope you enjoyed my tutorial today.
Hugs


WOW, ist das schön
ReplyDeleteglg Gertrude
So beautiful is the finished creation and thank you for the tutorial also very helpful x
ReplyDeleteGorgeous and fabulous tutorial, Rebekah.
ReplyDeleteFabulous card/gift and thanks ever so much for such a plain tutorial.
ReplyDeleteFabulous! Love the colours and this is always such a perfect gift! Take care Zo xx
ReplyDeleteGorgeous!
ReplyDeleteAnj
xx
Amazing tutorial, Rebekah
ReplyDeleteSusan xx