Welcome to another Polkadoodles challenge and we have a rather apt theme this week!
But before we go onto this week's challenge we need to announce the top three from Week 26 Challenge which was Animals. The top three as chosen by the Design Team are:
1st Place - Scatty Jan - you win a download bundle- please use the code PD1W2826 to claim your prize
2nd Place - Catherine - you win a download bundle - please use the code PD2W2826
3rd Place - Jacki - you win a download bundle - please use the code PD3W2826
Congratulations to you all. Please email Nikky and don't forget to quote your winners code - we cannot release prizes without it! Blinkies are in the sidebar for you to grab.
We have a few little rules which makes our life a lot easier when we come visiting your blog:
1. Please follow the challenge theme!
2. Only enter your creation into a maximum of 10 challenges including Polkadoodles
3. Please link your blog post and not your blog address with the linky tool - this saves us from searching your blog for your entry
4. And please, no back-linking to previous posts - these will be disregarded from our top three voting
5. If you have word verification on your blog it really does slow us down when leaving comments - please consider turning off word verification especially as the comment moderation has a spam section.
Right, onto the challenge for this week and the theme is:
Please don't forget our rules and good luck - the challenge ends on Sunday 21 July at 12noon GMT! And the top three placed entries will each win a copy of the Bonbon Belles Double CD which is worth a whopping £17.99!!
So, lets have a look to see what the Design Team created!
Shell- For my Summer Fun card I have used the beach huts and deck chair combined with papers from the Bonbon Belles CD. I created the clouds with distress inks and a template I made. I coloured the image with promarkers x
.JPG)
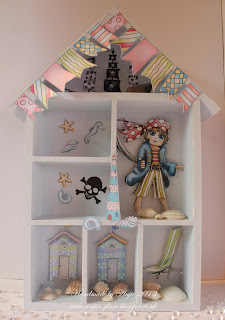
Anjie - For my project for Summer Fun I have done something a bit different. I bought this box frame from a local craft shop and decided this would be perfect for what I had in mind. All the elements are from the fabulous new Bonbon Belles CD. I've 3D'd some of the elements and added some real sea shells I have gathered on my travels.
Lizzie - I have used the new CD Bonbon Belles to make my card. Again I have gone for a CAS card. I used the elements from the CD for the Ice creams, cherries and strawberries ! I printed another set of images off and cut them out using 3D foam to give dimension. I glittered up the ice-creams with stickles glitter glue.


But before we go onto this week's challenge we need to announce the top three from Week 26 Challenge which was Animals. The top three as chosen by the Design Team are:
1st Place - Scatty Jan - you win a download bundle- please use the code PD1W2826 to claim your prize
2nd Place - Catherine - you win a download bundle - please use the code PD2W2826
3rd Place - Jacki - you win a download bundle - please use the code PD3W2826
Congratulations to you all. Please email Nikky and don't forget to quote your winners code - we cannot release prizes without it! Blinkies are in the sidebar for you to grab.
We have a few little rules which makes our life a lot easier when we come visiting your blog:
1. Please follow the challenge theme!
2. Only enter your creation into a maximum of 10 challenges including Polkadoodles
3. Please link your blog post and not your blog address with the linky tool - this saves us from searching your blog for your entry
4. And please, no back-linking to previous posts - these will be disregarded from our top three voting
5. If you have word verification on your blog it really does slow us down when leaving comments - please consider turning off word verification especially as the comment moderation has a spam section.
Right, onto the challenge for this week and the theme is:
Summer Fun
Please don't forget our rules and good luck - the challenge ends on Sunday 21 July at 12noon GMT! And the top three placed entries will each win a copy of the Bonbon Belles Double CD which is worth a whopping £17.99!!
So, lets have a look to see what the Design Team created!
Shell- For my Summer Fun card I have used the beach huts and deck chair combined with papers from the Bonbon Belles CD. I created the clouds with distress inks and a template I made. I coloured the image with promarkers x
.JPG)
Anjie - For my project for Summer Fun I have done something a bit different. I bought this box frame from a local craft shop and decided this would be perfect for what I had in mind. All the elements are from the fabulous new Bonbon Belles CD. I've 3D'd some of the elements and added some real sea shells I have gathered on my travels.

Lizzie - I have used the new CD Bonbon Belles to make my card. Again I have gone for a CAS card. I used the elements from the CD for the Ice creams, cherries and strawberries ! I printed another set of images off and cut them out using 3D foam to give dimension. I glittered up the ice-creams with stickles glitter glue.

JAN: Oh I'm in love with the new Bonbon Belles CD, so out it came for my card this week. The papers are from the lush 'Chocolate Lime' section and images are all from the CD with a few real shells for extra embellishment!

Kim - For my card I've used the fabulous Bonbon Belles CD as when I think of summer fun, I think of 'beach' and these beach huts are just fantastic! I've used three different images of the huts, together with a deckchair! The gorgeous cloud backing paper is also from the cd, as is the stripy paper and that lovely bunting!

Lou: For my card, I have also used the beach huts from the new Bonbon Belles CD. I have also written this weeks tutorial about how I made my card using my "Word" package on my computer to create a single layer card .......however ....... I have also HAD TO make my card more 3D and add a few layers with some fussy cutting too!!!

Ruth: I've gone for a simple yet cheeky number! Made with my own template (the trick to get the two sides to balance is to draw it once and then draw round it on the other side!) with papers from the brand new Paper and Pen Circle 8 magazine plus ribbons and seed beads from my stash. For another view of the card - pop over to my blog!

Mister Linky's Magical Widgets -- Thumb-Linky widget will appear right here!
This preview will disappear when the widget is displayed on your site.
For best results, use HTML mode to edit this section of the post.
This preview will disappear when the widget is displayed on your site.
For best results, use HTML mode to edit this section of the post.


.JPG)