Friday 31 January 2014

Wk 5 Polkadoodles Challenge - Anything Goes/Oriental

Hi everyone welcome to another Polkadoodles challenge!
We hope you're having a great crafty week full of inspired makes and plentiful stash! :D

We have some exciting news today - the new Polkadoodles Digistore is now open on Etsy!
To celebrate you can get some great new digis over there and this range will be updated regularly so make sure you add us to your Treasury and follow us for updates! 
To celebrate you can get this gorgeous brand new digistamp by Nikky for just 22p!! YES!! 22p!!! 
Total bargain!! 
This is only at this price for a limited time so make sure you go and grab the bargains now! 
Just click the image to go to the new store!

So our challenge for you this week - as ever - is 
ANYTHING GOES
But as always we have challenged the Design Team to make anything 
Oriental 
this week. They are all LOVING the brand new Goes East collection as you can see and you can also grab that here too! We don't 'do' oriental here particularly because it can be so dark and overbearing but we are all in LOVE with this new collection! It's perfectly LUSH!
Remember - you don't have to use Polkadoodles products to enter the challenge and we choose a Random winner each week - this week you can 
win a copy of the fantastic Goes East collection which is worth £15!

You can see who won our last challenge at the bottom of this post but in the meantime to take you on your journey here's the inspiration for this week.....

Ruth: I've made a quick card using one of the images from the CD, coloured with Promarkers and then used an X Cut die as a template. The digi images are stunning and are wonderful to colour! And who wouldn't want such vibrant red hair!!


Zoe - I'm loving this new Dollie Daydream goes East, oriental collection. The papers and images are gorgeous so it was so easy to make this project. I used one of the papers which I cropped before adding the fab sentiment. I printed out the stunning character and coloured her with a mix of markers including the amazing Graph'It markers.  Simple matting and layering completed my card.

Scatty Jan This is such a fantastic CD Dollie Daydream goes East,  . I am adoring all the images , I just could not pick one image to work with - They are so very easy to colour. There are some really lush papers and stacks of fabby emblies. I have coloured up using promarkers xx
Claire C  I've been in my element colouring up all the gorgeous new images on the Dollie Daydream Goes East collection, the images are all stunning and there are so many beautiful backing papers and other goodies to choose from. I've coloured Dollie and the flowers with my Graph'It Markers and layered them up over one of the papers. 

Katie here and I must say that I love, love, love this new collection. Dollie Daydeam Goes East has beautiful Papers and a great range of images. My card is A5 and has a coloured image of Dollie and one of the backing papers all backed onto black card The fan is made with one of the monochrome
papers.  I loved playing with the colour in this collection, we all need a little colour after this grey winter! Enjoy and Happy Chinese New Year! This year is the year of the Horse. Keeeeeep Crafting!!
Shell-Wow I think this cd is gonna be a huge hit..I don't normally do oriental but Nikky has changed that. I adore Dottie like this. For my card I have used a paper from the cd and Dottie has been coloured with a mix of copics and promarkers..The pagoda has been cut on my cameo machine.
Anjie - I've always struggled with Oriental but this CD has totally changed my mind! I LOVE it, the images are beautiful, and the papers are to die for! The colours used in it are lush. The image, papers, flowers, sentiments and words are all from the fab Dollie Daydream Goes East CD. The image is coloured with Graph'It Markers. The fan is cut on my Cameo.
 
Susan -  I love Oriental so this new CD was right up my street ,and its young ,bright,fun and funky ,Nikky has really  gone to town on this collection. Dollie Daydream Goes East is a must have.
I used Graph'it markers to colour the image ,papers are from the CD and the Ginger Jar was cut on my Cameo.


Lizzie - I used these lovely Oriental flowers and sentiment from the new Dolly Daydream Goes East CD its a GORGEOUS CD !!For some reason I am in a CAS mood with my cards .....don't know why ... I haven't stopped with the glitter tho !! I glittered up all the flowers with my Stickles !!!
Rebekah - Well I think the girls have said it all regarding this stunning new Dolly goes East CD. There are so many fabulous elements. I have used papers, sentiments, image and butterflies all from the CD for my oriental card this time.

WOW!!! WHo knew Oriental could be this lovely! The team have done a great job this week!!!

So let's get to the winners from Week 3!
Chosen randomly by random. org our main winner is
*drumroll please*
No 21 CARLYANN 
Well done!! Email us here to claim your prize, you won £10 of downloads! 

Our Top 3 this week as voted by the Design Team are:
#23 Jackie
#38 Haththi
We also would like to give a special mention to #34 Lyla who entered the challenge is only 12 years old! Fantastic card Lyla, the whole team loved it so we wanted to give you a special mention!
Well done everyone - grab your blinkies from the sidebar! 

PLEASE PLEASE PLEASE REMEMBER -  We only allow TWO entries each to the challenge, so many of you are entering more and we don't count you! PLEASE DON'T! We feel bad eliminating you from the challenge but we have to keep the random draw fair for everyone!

Closing date for the challenge is Sunday 9th February at 12noon GMT and don't forget to link your actual blog post so we can come and visit you!
Rules: 
1. No backlinks
2. Please FOLLOW the challenge theme!
3. Maximum of 2 entries per person!


Mister Linky's Magical Widgets -- Thumb-Linky widget will appear right here!
This preview will disappear when the widget is displayed on your site.
For best results, use HTML mode to edit this section of the post.

Thursday 30 January 2014

S12 shaped card tutorial

It's Anjie here today with a tutorial for Studio 12 at Polka Doodles.
I am going to show you how to make a shaped card using a die. 
The papers and embellishments I have used are all from the fabulous Studio 12 CD-rom...Picknix Collection 1.
To start with choose the die you want to use and a card blank that is just smaller than the height of the die.
Lay the die over the top of your card blank so the top of the die hangs over the top of the card. I have also chosen to have it over the edge at the bottom as well as this die wouldn't stand up.
Pass through your die cutting machine and you will now have to shaped card.
To make up your card chose a paper and use the next size die to cut out the paper.
 Trim the top and bottom of the die cut paper to have straight edges at the top and bottom to match your card blank.
Next choose all your embellishments and cut them out. 
 I then used a distress ink to ink the edges of the card, the paper and all the embellishments.
 And finally put your card together. I added a bit of lace and some faux stitching around the edges of everything.
I hope you found this useful and will try it out.

Wednesday 29 January 2014

Get in Shape Tutorial!!

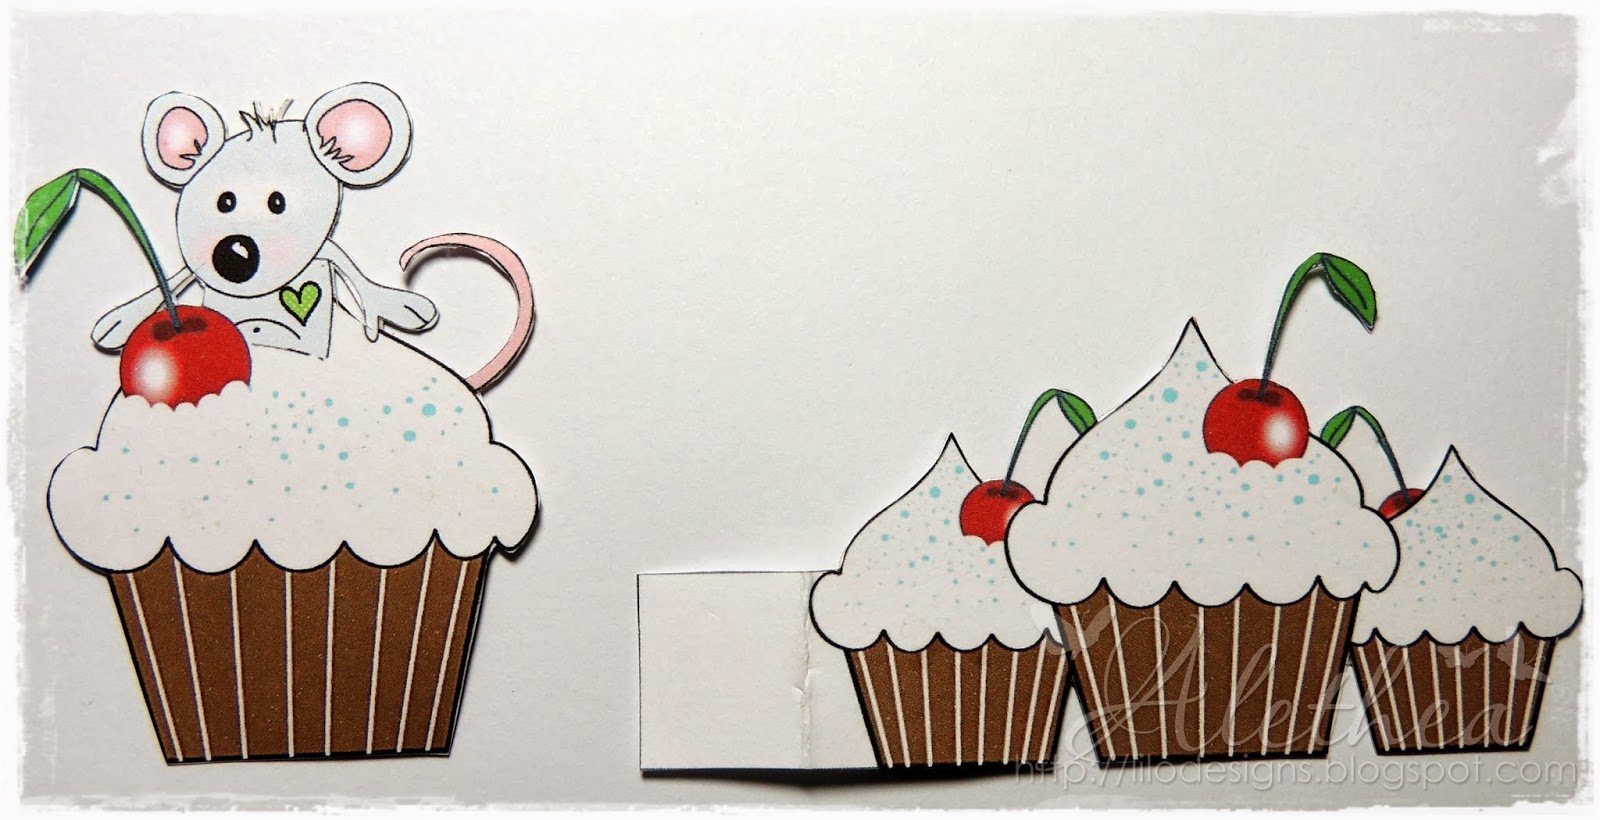
Hello, Alethea here with a quick tutorial to share!! It's coming to the end of the school holidays  and we have been away a lot so the tutorial I had planned never eventuated... So today I decided I would do a Joy fold card but while browsing through the fabulous Polka Doodles cd rom collection that I have, I came across these fabulous Get in Shape cards from the All Around and Everywhere cd so thought I would share that with you..
I decided to use Benny Mouse Get in Shape card so I printed out all the elements I wanted for my card. I made the base of the card to the measurements of 4"x 5 3/4", then sized the rest of the elements to fit.

I then cut them all out and pasted the back and fronts of the images together


Because these were not printed on proper cardstock I decided to stick it onto some white cardstock but before doing that decided to add some ribbon.

 Before sticking this panel on the white cardstock I added the cupcake and mouse elements. I was going to 3-D the mouse and cupcake but decided because I stuck it at the back it would look a bit silly and not sit properly, glued it on instead.

I then stuck it all down on the base cardstock and finished the card off by adding  kindyglitz to the sentiment, the cupcakes and the centres of the flowers. I also added some crystal effects to the cherries to make them look shiny.

Such a sweet card.. I love these Get in Shape cards and there are loads to choose from... Lots of other things on the All Around and Everywhere cd that I want to create now so watch this space....
Don't forget there are so many cd collections over at the Polka Doodles store including the new collections Dollie Daydream and Dollie Daydream goes East.
Thanks for stopping by.
Alethea xx


Tuesday 28 January 2014

Wk4...Digi Choosday Challenge - Anything Goes/In the Pink

Happy Tuesday everyone and we all hope you're having a great crafty week!

Let's get straight to the good stuff today....
We have a special offer code 
for you this week for the Download Store - use code DCw440 at the checkout and you will save a massive 40% off all our digi products - woohoo! The code ends midnight on 2nd Feb so make sure you grab some lovely digis to work with!

We also have THE most stunning new addition to our CD collections this week - I am not usually a big fan of Oriental designs so I've always steered well clear of this genre but I had a little spark of an idea over Christmas when I saw a particular colour palette and so I got to work on Oriental with a Polkadoodles twist. Now, if you don't like Oriental either, I think this might change your mind! A gorgeous colour palette and stunning images and papers in this collection - we are all going WILD for it on the Design Team!

Obviously Valentine's is on it's way too and we have some brand new and yummy Emma Canning digis up for grabs too - Emma's designs are so cute! Check them out here!

So let's get on with the Challenge this week. As always our challenge is 
ANYTHING GOES
but we always challenge the Design Team with something special, so this week they had to go with
IN THE PINK
and boy, did they come up with some lovely makes as usual!

Don't forget you DO NOT need to use any Polkadoodles stash to enter because it's Anything Goes here, but PLEASE do not enter more than twice! We pick a random winner so to make it fair if you add more than this you will not be counted!!!

You can see the winners of our last challenge at the bottom of this post.

Let's see what the team made this week....

Zoe -  Challenged to be 'In The Pink' I took this very literally and used a bold shade to colour this gorgeous Dollie Daydream Girlie Talk  character using a mix of markers including Graph It's.  I coordinated the ribbon and ticket sentiments by colouring them to match with my markers. A simple embossed background set it all off.

Scatty Jan  I have made a card using lots of girly accessories from Dolly Daydream CD - there is so very much to choose from on there - its hard to decide which of the yumminess to use. I changed my mind so much xx
Debbi -Dollie is certainly 'In the Pink' on this card. I used the gorgeous new 'Dollie Daydream - Girl Talk' cd collection to make my card. I love that it has flowers that you can cut out a shape. I used the spiral roses and daisies...cute!! And Dollie is of course there looking very pretty in her pink dress :)
Anjie -  Instead if just doing a card with pink papers I thought I'd go with pink hair as well! The image, papers, sentiments and build a fleur are from the Dollie Daydream Girl Talk CD. The image is coloured with Graph'It Markers. I have made some rolled roses from the same papers and added a few die cuts.
The Graph'It's I used are:
Skin: 4115, 4155, 4170, 4175
Hair: 5110, 5180, 7150, 7155, 7160
Clothes: 9107, 9106, 9105, 9104, 9103

 Sally - Hi, Its in the Pink week!  So I thought I would use one of Emma Canning's new images, this cute little teddy! I coloured him pink, using my Graph'it markers and cut him out. I used a digi from a polkadoodle bundle and used my Pan Pastels to soften the edges. Mounted it on black card stock and then embossed white card with my button folder and then used my Pan Pastels in pink to enhance the designs. Then matted it on black cardstock.  Added a flower and buttons to finish the card. Cute eh?
Susan. This week I thought it would be nice to think of Spring for a change to all this wet and windy weather. So I have used every thing from Cherryblossom Lane ,this is such a sweet CD and so much to choose from and it could be that its on SALE!

So there's the inspiration for today! 

So onto this week's winners! 
We use Random.org to randomly select our winner each week and for our 
Week 2 challenge that is 

No 10, La Diva
- well done! 
You've won a 5 downloads! woohoo!

As always the team also love to see what you've made and choose our favourite Top 3 which this week are: 

no #8 Mags, #26 Eva , #5 Zora
well done Ladies, you have all also won a free download - grab your blinkies from the sidebar and thanks for joining us! 
Email me here to claim your prizes!

Remember you do NOT have to use our products (although obviously we would love it if you did) , just add your entry to Mr Linky below and pinch our badge for your blog sidebar - we'll see you back here on Friday for our usual Polkadoodles challenge....

Rules: 
1. No backlinks
2. Please FOLLOW the challenge theme!
3. ONLY TWO ENTRIES PER PERSON ALLOWED to make it fair for the random winner!
Mister Linky's Magical Widgets -- Thumb-Linky widget will appear right here!
This preview will disappear when the widget is displayed on your site.
For best results, use HTML mode to edit this section of the post.

Sunday 26 January 2014

A tea light card tutorial

Hello everyone, Rebekah here with a little photo tutorial of a Tea light card I made using some of the stunning papers and digis from the Dolly daydream collection at Polkadoodles.
Here is my finished product..
Both my papers and image are from the exclusive add ons you get when you buy the CD through Create and Craft TV. I just adore this sweet image that I have coloured with my prisma pencils.
So here is how I made this...
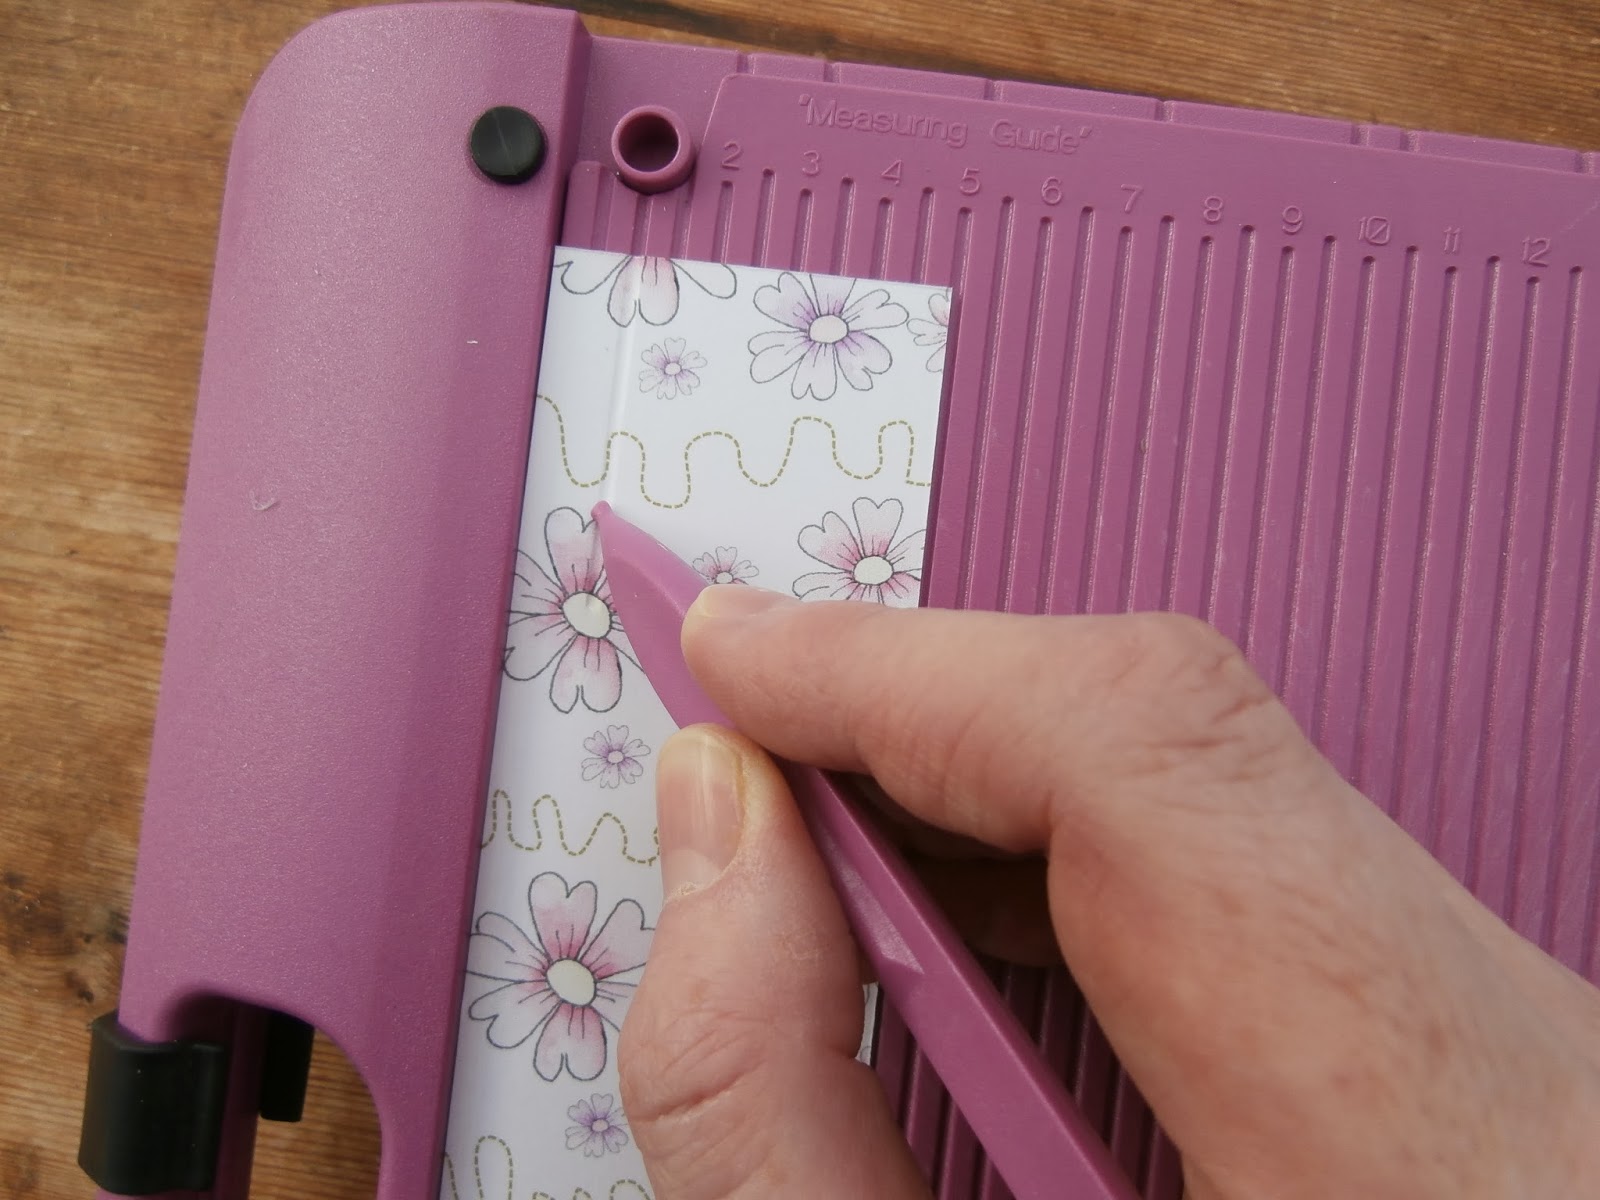
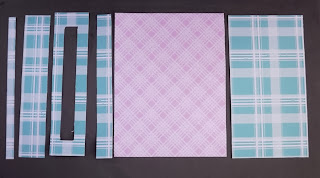
You will need a piece of cardstock 16cm by 30 cms and score in straight lines at 1cm, 3cm, 7cm, 9cm and 21.5cm as indicated in the picture, making the last piece 8,5cm long

In the 4cm gap you want to cut a whole 1cm wide by 12cm long as central as you can get it, this will be your tea light window.
You will then need to cut pieces of patterned paper to decorate. I tend to cut mine slightly smaller so I can have a border and the big piece will be the inside of your card so if you want to make it a different colour (like I have done) then you can. You also don't need to cut the tiny 1cm strip like I have as this will be folded under and not seen.
You want to stick on your pieces as indicated making sure the bigger piece is for the other side unless you want to decorate all the sides.
Here is the inside of my card
I tape some double sided tape to the icm strip and fold at all the scored edges. If you fold the main card inwards it gives you a good line to know where to stick your tea light holder edge.
You can decorate the inside and add a piece for writing on and when you add your tea lights (it will take 4) then pop a ribbon around to keep them held in tightly.
And then you can decorate the front flap of your card.
I hope you enjoyed my tutorial today.
Hugs 

Saturday 25 January 2014

Circular Gift Bag Tutorial


Hi there !! Lizzie here, its my turn today to share a tutorial with you.
Several people asked me how I made this gift bag
so I thought I'd make one for this tutorial !
I used  the Polka Doodles CD
Cherry Blossom Lane.

Cherryblossom Lane CD Rom Collection

To make this you will need :
A score board and tool,
Die cutting machine,
Grand Scalloped circle dies,
3D Foam pads, Flowers, Leaf die/punch
Swirl die, ruler, glue gun, silver and green card,
3 sheets double sided card, ribbon, sentiment,
Characters, inks, glitter glue, hole punch,scissors......
phew think that's it !!! lol


Using two of your double sided sheets of card,
cut a circle from each and ink the edges.


On your third sheet cut a strip 6cm wide using the whole length.
Score 1cm on either side.


Ink the score lines and then fringe cut the sides so that the paper
will curve to go around the inner of the circles.


Using the hole punch, punch two holes for
the ribbon to thread through. 


Adhere using hot glue the strip of card to one circle.


Then adhere the other circle on top
 

Tie your ribbon through the holes,
 ink and glitter the edges around the sentiment.
Cut and adhere the swirl with the flowers and leaves.
Add the characters and sentiment and more flowers.
Glitter all the flowers and the bag is complete !


Happy Crafting !!!