Friday, 29 November 2013

Week 48 Polkadoodle and Studio 12 Challenge - It's a Sketch!

Hi everyone and welcome to another challenge day!
Firstly we have lots of readers from the USA and we would just like to wish you all a very
Happy Thanksgiving
Thankyou to every single person who reads this challenge each week and especially to those who enter, we appreciate all your support!


The Random Winner of our Week 46 challenge is: 
No 12, Susan Renshaw - well done! 
Please email us here to claim your prize which is a £10 gift voucher to spend at Polkadoodles, woohoo!
Our Fave Top 3 this week are: No 4 Bo , No. 8 Elena and No 12 Susan
Well done ladies, grab your blinkies from the sidebar and thanks for joining us! 


Follow the Sketch Design Team Challenge...

For you guys at home you can do an ANYTHING GOES but if you can we'd like you to include 2 elements at least from the sketch!...

the design team had to follow the sketch of course, so let's see what they made...


We love sketches! They can really help massively when you have a creative block and if you have loads of cards to make in a batch they are also great at keeping you focused and on track. You can take the same sketch and twist it, turn it, interpret it how you wish, the choice is yours.

The winner of this challenge will receive a Polkadoodles goodie bag  - great prize!! 
Closing date for the challenge is Sunday 8th December at 12noon GMT and will be announced on Friday 13th December - and don't forget to link your actual blog post so we can come and visit you! 


Let's get to the inspiration from the Design Team this week!...


JAN - Here's my take on the sketch using papers and sentiment from the 'Angelberry Christmas CD' and all other embellishments are from the 'A Home for Christmas CD'. I layered most of the images digitally, then printed out the little house again and decoupaged it and added some glitter for the snow.
Lizzie - I have to admit I find sketches hard and I struggled for a while until in the middle of the night I had an idea !! A header for sweeties I thought .......... Then I thought how about a header for Reindeer food and as I am going to a craft fair next weekend I could make loads and sell them !!!


So that 's what I did !! I used the A Home for Christmas CD for this, paper and all the embellishments are from the CD. I just put them together with text in my graphics program ! The star has Santa flying through it, the three circles are the Reindeer, the ribbon is the vertical line and the Title is the horizontal line !! I did 3D up the embellishments too and added a poem to the back.


Bev Ok so I've not done a tutorial for a while so thought I'd share some photos with you all on how I put together this weeks design team piece. You can see this in full on the post below this challenge...
Anjie - Here is my take on the sketch. The papers, image and sentiment I've used are all from the Angelberry Christmas CD and the ribbon from my stash.

Shell-Oh I do love a sketch, for my take on it this week I have use an image from the A Home For Christmas CD, the fab image has been coloured with copics and promarkers, I added a few die cuts to finish it off. I wanted the image to really pop off the page so I went with an embossed paper.

Ruth:  I went for something a little different and used the very cute bear from Sundae of Seasons and I've gone for the decoupage version.  Two fancy die cuts and some pink organza ribbon plus three pearlescent stars make up the rest of the sketch and I've added a sentiment from A Home For Christmas cd.


So there is all the fab inspiration from the team - I'm sure you'll agree that they're all superb makes!
Remember you do NOT have to use our products (although obviously we would love it if you did) , just add your entry to Mr Linky below and pinch our badge for your blog sidebar - we'll see you back here on Tuesday for our usual Digi Choosday challenge....
Rules: No Backlinks and no copying another blogger's work and passing it off as your own please!
Mister Linky's Magical Widgets -- Thumb-Linky widget will appear right here!
This preview will disappear when the widget is displayed on your site.
For best results, use HTML mode to edit this section of the post.

Getting Tough...Tutorial by Bev Shortley

I've not done a tutorial for a while so thought I'd share some photos with you all on how I put together this weeks design team piece.
I printed off my choice of papers, emb ellies& digi from Pretty Tuff CD Rom, coloured my image and ribbon to match with Graph It Markers
I mounted my papers and text on contrasting card stock from my crafty stash.
I then added my matching ribbon to the left hand side of my mat and attached it to an 8x8 card blank.
Then by following the actual sketch layout  for this weeks polkadoodles challenge I arranged my card.
I added some faux stitching (little black dashes) around the edges just to stop the eye wandering off the page and that is how I made this weeks card. A lovely, bright, funky design for an up and coming footballer.

See you soon! Bev xx

Tuesday, 26 November 2013

Digi Choosday...Wk 6 - Give Thanks!

Hey everyone - welcome to Digi Choosday!
If you'e never joined us before, Digi Choosday is our totally digital challenge where we hopefully inspire you with some great makes using digis from our Digistore and challenge you to come and play along too!
As an extra incentive, we have a GREAT deal for you today!
As our American Friends are celebrating Thanksgiving this week we are giving you all a 
huge discount on all our downloads
 - simply use code DCW635 and you will 
save a huge 35% 
off all downloads until Tuesday 3rd December! Wowser! 

So onto this week's winners! 
We use Random.org to randomly select our winner each week and for our Week 4 challenge *Celebrations* that is 
No 9, Jessie L - well done Jessie! 
You've won a great Download bundle! woohoo!
As always the team also love to see what you've made and choose our favourite Top 3 which this week are:no 2, Mirella.... no 16, Kym....and no 3 Veronica...well done Ladies, grab your blinkies from the sidebar and thanks for joining us!

So this week, our challenge is easy to guess - to Give Thanks or make a Thanksgiving card! Looks like this has the team thinking a little! If you don't have anyone to make Thanksgiving for you can enter a Thanks card too but as usual Anything Goes with some extra brownie points for sticking to the challenge. The winner of this challenge will win 5 free downloads! woohoo!
You have until Tuesday 3rd December to enter and the winner will be announced on 10th December.
Right, let's see what the team have made this week - good luck everyone!

Debbi - Happy Thanksgiving to all our friends in America. I had so much fun making these cute little pumpkins for a table decoration using the Boys Hoot and Tail Feather collection. Every other panel was embossed  and I used Spiced Marmalade Distress Ink to highlight.
Zoe - I took inspiration for this challenge by reading up on Thanksgiving and learning about the parades, music and traditions. I thought I'd create an album cover ready to add pages to, full of those photos people take during celebrations. I used Emma Canning's Band Camp image to represent the music and parades. I coloured her with a mix of markers including the fabulous Graph It's. I used paper, washi tape & elements from my stash. That's the beauty of digital images you can make them work with whatever you have!
Sarah - I must admit to being challenged by the challenge this week.  I've never made a Thanksgiving card before - but I got my thinking cap on and came up with this.  I used a pre-coloured pumpkin image from the Witchie Witchie 2013 download bundle (shows how versatile this set can be!) and simply copied and pasted it twice more to create the three pumpkins.  I then cut the image out with a nestie, popped it onto 3d foam over a scrap of paper that I'd printed out from a previous card, added some twine, buttons and stamped a sentiment.
Scatty Jan  For my Thanksgiving project I have used the lovely image by Emma canning - Christmas Dinner....Coloured with promarkers and an extra Turkey cut on my portrait.Yummy I cant wait for my Turkey xx
Susan - I have to admit my mind just through a blank for this challenge, but that's why it called
a challenge! So I thought that I'd have a go with craft artist and this is the outcome. The papers are from the amazing Digi collection Christmas Joy and the image is Christmas Dinner. Coloured with Graph'it markers. Just can't wait to see all the amazing entries and good luck everyone  xxx
Cara....I also chose to use the adorable Emma Canning image Christmas Dinner for my Thanksgiving card.  I coloured her with my Graph'it markers of course and used papers from the Christmas Joy Download Bundle.
Sally - Hi here is my Digi Choosday Challenge card- Happy Thanksgiving.  Being a Brit married to an American, we celebrate Thanksgiving, have some friends or family over and have a Roast Turkey Dinner with all the American trimmings! (Not as good as our Christmas Dinner). I have chosen one of Emma Canning's digi images with a Turkey as that is what it is all about!  I coloured her with Graph'it markers and added liquid accents to the turkey to make him look like he has just come out of the oven, glitter to her hair and boots. I matted her on some backing papers from the Home for Christmas CD Rom and some gold cardstock from my crafty stash.
So there's the inspiration for today! 
I'm sure you'll agree that they're all superb makes again this week, love love love all the work these guys have put in!

Remember you do NOT have to use our products (although obviously we would love it if you did) , just add your entry to Mr Linky below (you have until Tuesday 3rd December to enter and the winner will be announced on our Week 8 post Tues 10th Dec) ...we'll see you back here on Friday for our usual Polkadoodles challenge....

Rules: 
1. No backlinks
2. Please FOLLOW the challenge theme!
Mister Linky's Magical Widgets -- Thumb-Linky widget will appear right here!
This preview will disappear when the widget is displayed on your site.
For best results, use HTML mode to edit this section of the post.

Sunday, 24 November 2013

Tutorial - Paper Bauble

Hello there! Asha here and it's my turn to do the weekly tutorial. I'm going to show you how to make this fun paper bauble which was posted on Friday for our PolkaDoodle Challenge "Inspired By A Christmas Carol".


1. Cut out 20 circles out of patterned paper of the same design or a combination. You can use a die or a punch to cut out the circles but make sure they are all the same size. For my sample, I used a 2" die. Also, cut / punch 1 extra circle out of plain paper which will serve as a template.


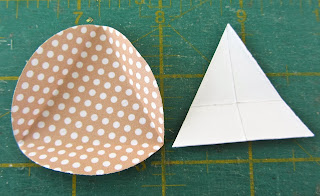
2. Make a triangle template. Take the plain circle and fold it in half horizontally and vertically so that the circle is creased into quarters (circle 1 below). Fold each side to meet the centre starting at the bottom (circle 2 below).  Next fold down the top right, followed by the top left, each time meeting at the centre. (circle 3 below). Cut along the crease lines and you will end up with an equilateral triangle. This is your template (circle 4 below)


3. Place the template on the circle, with the pattern facing up, and fold up the circle along the sides of the triangle. Make sure you get a good crease on the circle to match the triangle template.


4. Repeat this on all the remaining circles.


5. Start by glueing 5 circles at the folded flaps, as shown below. This will form the "lid" of the bauble.


6. Cut some twine or thin ribbon, fold in half and tie a knot to make a loop.


7. Carefully pass the loop through the middle of the "lid". Use a needle or pokey tool to help you push. Pull the loop through until it stops at the knot. The "lid" is now ready.


8.  Next, glue 10 circles together in a strip - this will form the body of the bauble. Finally, glue the remaining 5 circles in the same way as for the "lid" to make the bottom.


9. Finally, assemble the bauble by gluing the top 5 flaps of the strip to the 5 free flaps of the "lid". This will leave you with 5 free flaps (see below) which you will glue to the free flaps of the bottom piece, thereby closing the bauble and completing the sphere.


10. Your bauble is now ready! 


This project was great fun to make. It does involve some cutting / punching and folding, which makes this the perfect project for the entire family.  Have fun making these for Christmas!


Friday, 22 November 2013

Wk 47 - Inspired by a Christmas Carol

Welcome to another challenge everyone!

Before we get to our theme and the inspiration, we have an exciting announcement to make:

DESIGN TEAM CALL!

We are looking for someone talented to join our fabulous team. 
If you love creating cards, journals, scrapping, whatever it might be, we would love to hear from you! This is open to both UK and International crafters. 

You must be: 
Committed for at least 6 months
BE able to use digital products and enjoy stamping and papercrafting
A regular BLOGGER and on Facebook and participate in social media promotions
You will be expected to post a minimum of every other week PLUS one tutorial per month. 
You will be required to comment and vote each week on a rota basis
Able to make physical samples for products to be shown on TV and in shows around the UK as and when required.
We will give you: 
Plenty of lovely stash to use and keep during your term
Exposure for your blog and your makes
A discount for the Polkadoodles store
Lots of fun and laughter along the way!

CLOSING DATE 30th November (please note: we cannot acknowledge all the emails but you will receive a reply no matter what the outcome once we have picked the team)...We look forward to receiving all your emails! x

So, let's announce last time's winners!...

So our randomly chosen winner for Week 45 is ..... number 5 Cass
Well done, email us to claim your prize of a £10 gift voucher to spend in the Polkadoodles store!

In addition, the Design Team have picked their favourite Top 3 and these are:
No 2 Chris F, No 7 Zara, and No 15 Suzi
Well done everyone! Grab your blinkies from the sidebar!


Now onto the theme for this week which is:

Christmas - Inspired by a Christmas Carol!

Although we set this challenge for the team, this week we've decided that 

you can enter ANYTHING GOES as a theme for Christmas.

Have a look at the fab samples from the Design Team.  Closing date for the challenge is Sunday 29 November at 12noon GMT and don't forget to link your actual blog post so we can come and visit you! 

We have tweaked our challenge rules and we are now picking a RANDOM WINNER each week to get one of our great prizes! We're doing this as a massive thanks to you all for entering each week and we think it's much fairer that everyone gets an equal chance to win some lovely goodies, so from now on, if you enter then you're in the draw! We will still choose our favourite top 3 as well! IN ADDITION, you can now enter as many challenges as you wish and are no longer restricted to 10!

Alethea - I have decorated a candle this week for my inspired by a song creation!! The song that inspired this was "Hark the Herald Angels sing" I have used images from the Angelberry Christmas CD and added kindyglitz and rhinestones to jazz it up!
Asha - This week I made a paper bauble using papers from 2 Christmas CDs: Angelberry & Home For Christmas. I made them plain, without embellishments because so often we overlook the gorgeous papers in these CDs. Of course you  are free to embellish these baubles anyway you wish. For me, baubles mean one thing "It's Beginning To Look A Lot Like Christmas"

Karon - My carol inspiration for my card was - can you guess?  "Oh Christmas Tree".  I used a fabulous cutfile for the snowflake (under the tree) from the Studio 12 Picknix Collection 1 CD, the papers are also from this CD.  The tree is a pre-coloured image that has been glittered up and this, and the sentiment are from the A Home for Christmas CD.
Sally - Hi, so our challenge this week was to be inspired by a Carol.  I chose this lovely image of three carol singers from the Here Comes Christmas CD Rom and two of the papers.  I cut a scalloped circle from the dotty paper using a Spellbinder's die. Then I matted it onto the other background typography paper which I matted on a burnished silver pearlescent card. I die cut some music notes and added the words of a carol - Noel, Noel.
Zoe - So this week, I took our DT challenge literally! 2 CD's it said, so sure enough I used the gorgeous 'Home For Christmas' cd together with the fabulous 'Angelberry' collection, but then I also took 2 old CD's to make the bases of my decoration. I printed off papers & embellishments from both collections to cover the cd's, and I also printed the beautiful digi image of the Angelberry Peace angel which I coloured with a mix of markers. Once everything was dry I glued each part to some Christmassy ribbon. My carol inspiration was 'The Holly & the Ivy'!
Claire C - I've made a little door hanger using my favourite polkadot papers from Angelberry Christmas CD and a sentiment and embellies from Here Comes Christmas CD, the images have been coated with Glossy Accents and I've added some Doodle Dewdrops and a few dots of gold stickles too
Lidia Hi! Everyone and for this challenge I made a simple card, I use traditionally colors, red and Green, the paper stripes and the image are from Sundae of Seasons CD, and the border are from Picknix CD Collection , I hope you like it.


Closing date for the challenge is Sunday 29th November at 12noon GMT and don't forget to link your actual blog post so we can come and visit you!

Rules: 
1. No backlinks
2. Please FOLLOW the challenge theme!

Mister Linky's Magical Widgets -- Thumb-Linky widget will appear right here!
This preview will disappear when the widget is displayed on your site.
For best results, use HTML mode to edit this section of the post.

Thursday, 21 November 2013

A giftcard holder

Good morning all, Miria here with a new project for Studio 12.
Christmas is just around the corner and I created a card to hold a gift card, of course you can also use it for bithdays or other celebrations.
I used papers from the so inspirational cd Picknix Collection 2 Gingerbread Twist - btw it's on offer on the shop, don't miss the chance to grab one!
I decorated the front ...


... and made a pocket inside to hold the card ...


I used my beloved tickets from the same cd and mesh and pearls to embellish.


Hope you liked it, have a nice day, Miria

Tuesday, 19 November 2013

Digi Choosday! Wk 5... All About Craft

Tuesday again - where do the weeks go??

Before we get to this week's challenge, let's announce the winners from last time! 

Our random winner from week 3 is No. 9 Donna - well done Donna, email us here to claim your prize, you've won a download bundle!
Our Top 3 favourites from Week 3 which was the Autumn colours challenge are:
No 3 Annie, No 11 Kym and No 15 AJ - well done everyone, grab your blinkies from the sidebar!

So onto today's Design Team challenge!
This week is ALL ABOUT CRAFT for the DT! 
We have some great crafty downloads in the store so make sure you check them out, they're so cute! 
For you guys at home, YOUR challenge is Anything Goes 
but if you can add something crafty you'll get extra points and likes so show us what you got! The winner of this challenge will win £5 of downloads! 
Let's see what the Design Team have to show you!...

Anjie... The image on my card this week is called Emma Canning To Die For and is available as an instant download so you can get crafting straight away! She is coloured with Graph 'It Markers. The papers are from the fabulous Sugarplum Daisy CD-Rom. I've added rolled roses using the same papers and some die cuts. The sentiment ticket is also from the same CD.
Zoe - This week I set about making something I've wanted to do for ages. A sign for my craft room door! I took a MDF 'Create' word and decorated it with paint, but Pan Pastels would work. I created a wire coil to attach my image which was matted and layered a number of times on colour coordinating card. The image is Emma Canning's Colour Me Happy digi which I coloured with a mix of markers including Graph It's.
Scatty Jan - This week I decided on a card using Emma Canning's Colour Me Happy digi - How great is she brilliant for any crafters birthday- coloured using promarkers and white gel pen - The front of the small card I added a sentiment and some glamour dust - The paper is from Tail Feather download bundle and the flowers are from Back to Nature download bundle which I finished off with some candi xx
Debbi - I have to admit that my craft stash needs a bit of a tidy. So this week I made a start (all be it a small start...lol) and have made a pen organiser for my Promarkers. The Emma Canning 'Colour Me Happy' digi stamp was perfect to add to the front.The panel were made using papers from the 'Christmas Joy' bundle, which is great as it can be used all year round and not just at Christmas.
Cara....I've gone with something different for me this week and done a very CAS style card ..I've used the Emma Canning Colour me Happy Digi, we all seem to have taken a shine to this image but if you pop by the store there are loads of "Crafty" themed images.
Jo - For this week's crafty project I used my graphics program to merge a cute polkadot paper from the Emma Canning animal and nature digi kit and a button embellishment from Sugar Boys digi kit, to create a completely different backing paper. I love how creative you can be with digital papers and embellishments :) The gorgeous image is Sew and Sew by Emma Canning. 
Katrina - for this challenge I have used the sweet Emma Canning Colour me Happy Digi - I decided to make a small hanging sign that I will be giving to a friend this Christmas! The image was coloured with copics and I stuck it to the sign using silicone - the words are cut from vinyl on my cameo :) 
Susan - I just love to sew ,so this was the perfect digi for me to use in this challenge, it's Sew and Sew by Emma Canning and the paper is from da! da! you've gest it Girls Hoot
I have listed everything used on my blog...
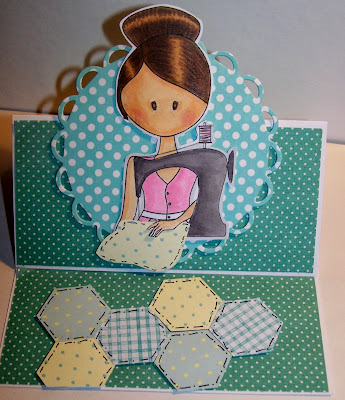
Sally - Hi there folks!  What a busy weekend I have had.  I got home late last night and knew I had to get this week's Digi Choosday challenge done.  I chose one of Emma Cannings lovely images and coloured her with my Graph'its and Promarkers.  I cut her out and mounted her onto a Spellbinders scalloped circle and then mounted her onto a easel card. I covered the background with some dotty paper which I had in my crafty stash and I am sure it is off of one of my Polkadoodle CD Roms and then cut out some hexagons using scraps again and made it like she was sewing a patchwork quilt. 
So this is my " Miss you Sew much" card x

Kevin I have used this gorgeous image called To die for from Emma Canning, and as always I have coloured her with my Graph'it Markers.


So there is all the fab inspiration from the team - I'm sure you'll agree that they're all superb makes!
Remember you do NOT have to use our products (although obviously we would love it if you did) , just add your entry to Mr Linky below and pinch our badge for your blog sidebar - we'll see you back here on Friday for our usual Polkadoodles challenge....
Rules: No Backlinks and no copying another blogger's work and passing it off as your own!

Mister Linky's Magical Widgets -- Thumb-Linky widget will appear right here!
This preview will disappear when the widget is displayed on your site.
For best results, use HTML mode to edit this section of the post.