Hello, fellow crafters! It's my turn to host a Polka Doodles Tutorial and I'm going to show you how to make an easy peasy mini pop-up card. So incredibly simple you'll be churning these out in no time at all. The finished project looks like this:
 |
| Cute little owl with a birthday greeting on the outside ... |
 |
| .. and another cute little owl pops up on the inside! |
Here's how to make this adorable project:
1. Get an image. I'm using this cute little owl from Polka Doodles Sugar Birdies CD and it measures 1-3/4" wide and 1-7/8"up to his eyes (2-3/4" all the way to the top). You need to measure your image because the pop-up mechanism has to be smaller than the image so that it's not visible.
2. Prepare the card base. I'm using heavy base weight CS to make a 4"x4" card.
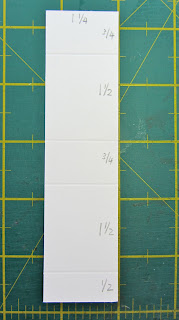
3. Make the pop-up mechanism. Based on the size of my image I cut a piece of layering weight card stock measuring 1-1/4" x 5". On the long side, I scored and folded at the following marks on my ScorePal: 3/4"; 2-1/4"; 3" and 4-1/5". ( Each section measures 3/4", 1-1/2", 3/4", 1-1/2" and 1/2").
4. The 1/2" section at the end is the glue tab. Apply some adhesive tape here.
5. Fold over and glue the tab to the top edge of the strip of card stock. You should have a box without sides.

a) the pop-up mechanism (the "box" behind the image) must be a little smaller than the image itself; and
b) the base card must be big enough to fit the image when it's folded down flat.
Here's another pop-up card, also using an image from the Sugar Birdies CD.
 |
| This card measures 4-1/2" x 3-1/2" ... |
 |
| .. and there's that little pop-up owl. Fabulous birthday surprise! |
The Sugar Birdies CD is full of cute elements that you can use to churn out quite a few of these dinky little pop-up cards. I hope you'll give it a go, it really is hoot to make! (Sorry... I couldn't help myself! LOL).
Happy crafting!
Beijinhos,


Great tutorial, Asha - I have never tried one of these! Guess I will have to give it a go now :-)
ReplyDeleteReally cute and gorgeous cards Asha and a very good clear tutorial too. Like Karon I haven't done this either but will now be trying it.
ReplyDeleteMany thanks and sending hugs, Fliss xx
Hi Asha, a fabulous tutorial and how cute is that owl!! Love it.
ReplyDeleteHave a super weekend hun.
Hugs Sue W.
Hi Asha, this is fabulous tutorial and love the cute owl.
ReplyDeleteHugs
Linda xxx
What a fantastic idea...will have to try this. Thanks
ReplyDeleteSo cute and thank you for sharing this
ReplyDeleteGreat tutorial and you made it appear so simple, will have to try this, a great card.
ReplyDeleteWow Asha your card is gorgeous & what a fab tutorial darlin. Big hugs Clare xxxx
ReplyDeleteOh I love this Asha! I will certainly be making one of these this weekend. xx
ReplyDeleteLove xx