Pages

Sunday, 31 March 2013

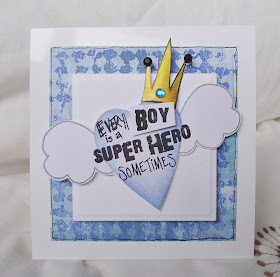
Keeping it clean and simple

Clean and Simple cards are very in vogue at the moment and I thought I'd give it a go .... which as many people know, I like to add loads to my cards, this will indeed be a challenge for me .....


My card has been made using a selection of stamps from the NEW Studio 12 range which can be found HERE and also the NEW Stamp Slab products which can be found HERE. This is a photo heavy tutorial only because I didn't want you to miss anything ....


1] I stamped the heart on to a piece of white card using 2 complimentary ink colours. This piece will be your "rough copy" so gives you a chance to play with colours! Now place the wings to look like they are flying on either side of the heart and cut out leaving a small border.


2] Now stamp the wings on to some vellum and leave to dry. I have used a pearlescent vellum for added sheen. From the back, emboss the wings to add shape and I have even added little marks around the edge to look like blanket stitch. Once you have embossed the wings, cut them out.

 
3] Carefully place your vellum wings on to your "heart and wings" (step 1) and stamp the sentiment over your heart and wings.


4] I then re inked the heart stamp in one shade of pink and then went around the edges in a darker shade of pink using a paint brush to create a feathering effect and stamped the heart again on a separate piece of white card. I cut this heart out leaving a very small border. At this stage, re stamp the sentiment on to your heart (see below) ...


5] Stick the wings on to the back of the heart lining up the sentiment which means you can now read the whole sentiment. Do not discard your "rough copy hearts and wings" as I have a plan for them! Now the sentiment comes with a "Boy" and a "Girl" stamp and as you can see in the photo, I have stamped the "Girl" on to a scrap of white card. Cut the sentiment out.


 6] Now begin to layer up your design on to a piece of white card. I decided my heart looked plain, so stamped a crown and added some gems to it ..... told you I had to add something ...... !


7] Here is my finished card. The background was made using the Stamp Slab .... a definite must have and soooo much better than the Gelli Plate (personal preference I know) .... and I will explain in another tutorial how I created the background. A little doodling around the edge of the backing piece and voila, my card is finished.


Oooohhh before I forget, do you remember the "rough copy" I said not to discard? (see photo below), well here is what I did with it .....


Yep, I recreated the same card but in blue this time. However I didn't use vellum for the wings, but the existing wings from the rough copy. This heart also has a snazzy heart too ...


Both cards were quick and easy to make but I think I need to resist the temptation to keep adding "things" ! Who know, one day I will truly make a "clean and simple" card .... lol

Have a great Easter weekend,

Lou
x

Friday, 29 March 2013

Week 13 - Paper Piecing

 Good morning folks, Happy Easter to you all and hoping that you get lots of lovely choccies but make sure you don't eat too many at once!

Before we get to our winners and the challenge details, we have some great news for you. Our Nikky has been hard at work designing and has a brand new mini CD now available. It's called Fredericka and is chock full of gorgeous new digis and lots of fabulous papers and embellies. There is also an exclusive paper pack free with the Cd at the moment so don't delay! There's a sneak peek pic below and you can find it HERE in the online shop. The Design Team have been playing with the new images so there might be a few creations coming up very soon!


Now for the winners from the Week 11 Easter Challenge - there were loads of fabulous entries which made it very hard for the DT but there can only be 3 winners and here they are:

1st Place - Zoe M  - you win a Sugarplum Daisy CD and please use the code PD1W1311 to claim your prize
2nd Place - Dewi Lestari  - you win a Download and please use the code PD2W1311
3rd Place - Stella  - you also win a Download and please use the code PD3W1311

Congratulations to you all.  Please email Nikky and don't forget to quote your winners code - we cannot release prizes without it! 

We have a few little rules which makes our life a lot easier when we come visiting your blog:

1.  Please follow the challenge theme!
2.  Only enter your creation into a maximum of 10 challenges including Polkadoodles
3.  Please link your blog post and not your blog address with the linky tool - this saves us from searching your blog for your entry
4.  And please, no back-linking to previous posts - these will be disregarded from our top three voting
5.  If you have word verification on your blog it really does slow us down when leaving comments - please consider turning off word verification especially as the comment moderation has a spam section.


This week's challenge is to make a project using Paper Piecing and as you'll see, the Design Team have created some fabulous inspiration for you.


Asha - This card is a response to a blog buddy who said that Polka Doodles papers are too whimsical for simple, grown-up cards. She couldn't be further from the truth! I made this with papers exclusively from the Cherry Blossom Lane CD. The butterfly and greeting are from the Gracie Fairy Flutterfly rubber stamp set. I paper-pieced the butterfly, added some bling and we have a simple (almost CAS) card, perfect for any adult.


Fliss - I've made a rather girly card with the gorgeous vintage lady digi stamp from the All Sewn Up Collection on the Studio 12 Picknix Collection 1 CD. I paper pieced her frock with the pretty deep rose paper from the Pretty Sweet CD which is where the grungy rose background paper came from too. I coloured the unpieced areas with watercolour pencils. I added a Marianne Design doily and roses from the Sugarplum Daisy CD layered up to finish.


Astrid - I have made girly tag with this lovely girl from the CD All Around & Everywhere
I paper pieced her skirt from this CD and also her jumper. The rest is coloured with copic markers.
The flowers are also from the same CD.
I distressed the paper with the Tim Holtz distresser, behind the image I added blue cardstock with a Cuttlebug embossing folder with little birds. Some pearls from my stash.


Karon - For my card I used papers from the Sundae of the Seasons and Cherryblossom Lane CD's.  My image is one of the Fairy Flutterfly stamps, this one is called Meeshelle.  I have paper pieced her top, trousers, bag and the little flower in her hair.  She was coloured with alcohol markers.  A sallsentiment and ribbon flower finish her off.


Sally - This is my first paper piecing card I have ever made and loved making it. I used papers from my crafty stash to paper piece my image and for my background. The stamps are from the Pen & Paper Circle No. 5. Also the image is coloured using my Promarkers. I cut out a frame for my little lad using a Spellbinders die. Cute eh?


Miria I made a small card using an insert from cd Cherryblossom Lane , I think it was a perfect background for this cute bunny from Emma Canning . I paperpieced  it with a paper from the same cd The sentiment is from cd Candy Doodles Collectors edition . I just added some pearls.


Alethea - I decided to make a card with a different fold today just for a change! And I used some new stamps I got from Polka Doodles - Meeshelle from the Fairy Flutterfly Rubber Stamp Set and Maxine from the Fairy Flutterfly Rubber Stamp set. The papers are from my scrap stash and I found the perfect stamp sentiment in my collection for these two fab girls!!! I then added these fabulous dew drops that finished off the card perfectly!!


Patty - I decided to make a CAS card for a friend on her Anniversary! And I used some new stamps I got from Polka Doodles Federicka- and also use the sentiment from the Rubber Stamps set i got from Polka Doodles - Stamp Doodles. The papers are from my scrap stash and I found there perfect from the card  I then added these fabulous the Ribbon and few half pearl to finished off the card !!


How's that for some fabulous inspiration! You have until 12 noon GMT on Sunday 7 April to enter and good luck!

...........................................................................


Thursday, 28 March 2013

Studio 12 Scrapbook Layout

Morning to you all, hope you are keeping warm and looking forward to Easter, although the weather is more like Christmas at the moment, its my turn to show you something using the Picknix collection 1 Cd. I decided to have a go at doing a scrapbook layout featuring my Grandson Ethan, I have used various elements from all three collections to layer up this design. For more details pop over to my blog here


Hugs,


Daniele xx

Sunday, 24 March 2013

Been using the fab new Studio 12 stamps ....

Am a lucky bunny and Nikky sent me loads of new stamps to play with and thought I'd share one of my experiments (!) with you !!!

I wanted to make a card that had no DP on it at all and also use colours that were outside my comfort zone. A while back Nikky and I were chatting over in a social networking site (I wonder which one that could be now?!?!?) and we both decided that yellow as a colour was one we didn't use very much, so, I have decided to use yellow as my accent colour. Sorry wasn't brave enough to make it my main colour .....


I have used the following stamp sets to create my card ....

*Pre-Order* Distressed Zig and Zag - stamp set*Pre-Order* Moments to Remember stamp set
*Pre-Order* Slab Stamps 1 - Shapes (A5)   *Pre-Order* Shabby checkers Stamp    *Pre-Order* Dreamy Trees - Stamp Set


I have created my panels making different backgrounds using a selection of the element stamps, inking the edges and then layering these on to white and black card. My main background was made using the cross hatch design from the Dreamy Trees set. I even used the lickle tree to make the leaves for my flower! My card was finished with a few gems and lables (?) nestie. The ribbon offcuts were from my stash.

Not sure why my photo is at this angle and will try and redo this so you get a better view of all the different stamped layers.

Update: More photos added .....

Hope the snow isn't ruining your Sunday too much and the vibrant yellow colours in my card, bring a little spring to your day.

Lou
x


Friday, 22 March 2013

Week 12 Challenge - Embossing

Welcome to another Polkadoodle challenge!  Before we move on, I need to announce the top three from challenge 10 which was Distressing:

Congratulations go to:

1st Place - La Diva - you win a Colour Therapy DVD - please use the code PD1W1210 to claim your prize
2nd Place - Rachel Fisher  - please grab your blinkie from the sidebar
3rd Place - Celine Jo - please grab your blinkie from the sidebar

Congratulations to you all.  Please email Nikky and don't forget to quote your winners code - we cannot release prizes without it! 

We have a few little rules which makes our life a lot easier when we come visiting your blog:

1.  Please follow the challenge theme!
2.  Only enter your creation into a maximum of 10 challenges including Polkadoodles
3.  Please link your blog post and not your blog address with the linky tool - this saves us from searching your blog for your entry
4.  And please, no back-linking to previous posts - these will be disregarded from our top three voting
5.  If you have word verification on your blog it really does slow us down when leaving comments - please consider turning off word verification especially as the comment moderation has a spam section.


Right, onto the challenge for this week and the theme is:


Embossing

Please don't forget our rules and good luck - the challenge ends on Sunday 31 March at 12noon GMT!  The winner of the challenge will win a copy of the Picknix 1 CD!  Now onto some wonderful samples from the Design Team!

Ruth:  I've gone for double embossing, cute and Easter all at the same time!  The pink and blue papers are from the very versatile Candy Doodles cd which I turn to time and time again as I love the soft colours!


Margaret...for this challenge I have used the beautiful papers from the cd Sugarplum Daisy the shaped card is cut with spellbinder dies, and the flowers,swirls and leaves cut and embossed  using Marrianne dies, inked with distress inks and the embossed sentiment has been done with cosmic shimmer mica powders...and a little bit of bling added.


Anjie - For this weeks card I have used an image and papers from the Pretty Tuff CD. The image is coloured with ProMarkers. For my embossing I've used a birthday embossing folder and strip. I've used co-ordinations card and sanded off the top. I've added a couple of paper clips and some faux stitching around the edge
                   

Pinky - For my card I used this adorable Bunny image from the Cherryblossom Lane Cd. The image has been coloured with promarkers. The papers have all been embossed using a freebie butterfly embossing folder and another folder I got from a lovely blogger friend. All has been matted onto some silver mirri paper and finished with a piece of pink and silver ribbon from my stash.


Clare - This week I decided to make a flower pot card using the sentiment and beautiful flowers from the All Around & Everywhere CD. I have used Kraft card which I have embossed with a folder on the flower pot and on the inside greeting card. I have added Brushed Corduroy Distress Ink Pad to my card and brown buttons and twine to the flowers. 


Kitty - For my card I have used one of the Time For Tea Digi's called Heart Balloon. I teamed her up with papers from Gingerbread Twist CD and i embossed the flower with a swiss dot embossing folder. :) 


Shell- For my card this week I have used Papers and image from Pretty Tuff CD, the image has been coloured with my copics....I have embossed a panel with a stars embossing folder and added a few star die cuts to finish.

JAN:  I have used the gorgeous 'Cherryblossom Lane CD' for my card this week and couldn't resist this little guy in his umbrella boat, which I coloured with my Promarkers. The background paper and sentiment are also from the CD and I chose to include dry embossing as part of the background.


Kim : For my card I've used the Back to Nature cd - just love those swirly peacock feathers! The tag is from the cd and I've added a sentiment, with eyelets punched through and ribbon threaded. I've added an embossed panel and some mulberry paper flowers. 


Annethis week I've used papers from the Candy Doodles CD and one of the Time for Tea Deaigns digital stamps exclusive to Polka Doodles.  I've kept it plain and simple with just an embossed border, some twine and a little butterfly charm.


Good luck with the challenge and don't forget our rules - closing date is 12noon GMT Sunday 31 March.

Thursday, 21 March 2013

Washing the dust

Good morning everyone. Its Dee here with today's post and I have been naughty and sneaked in a sample made with the new Studio 12 stamps.  If we all keep quiet it may just miss her eagle eyed radar, but then again maybe not lol.  It's all worth it though, so I'll endure the wrath to show you all something made with just a few stamps from this fantastic new range.  I have to say Nikky has some lush goodies in at the moment, just one is the new CD of Emma Cannings digi stamps 'Digistamp Heaven', fabulous value for money.  Think I'd better stop before I get carried away, if you want to see all the new items just click here.

Right, back to today's card (sorry I'm so easily distracted by pretty new things), I wasn't swearing at you with the title, it was part of the Pablo Picasso quote I used.  This card was made with my cousin in mind because she loves words, text and inspirational quotes.  I used the Stamp Slab for my background with liberal dollops of acrylic paints because I wanted lots of interesting texture and movement. The stamps I used are Fanciful Flourish, Road to the City, Shabby Checkers (soo useful) and Washing The Dust Off.  They are on pre-order on the Polkadoodles site at the moment, but do keep an eye open as they are starting to find their way into shops all over the country.
Tomorrow sees the Polkadoodles challenge so pop back to see oodles of inspiration from all the lovely talented DT ladies.

I'm off now to check out the new items section of the Polkadoodles site, I spotted some cool masks while I was sorting the links. I'm doomed, there's no way I'll hold my resolve lol

Tuesday, 19 March 2013

If Friends Were Flowers...

Hello lovely readers :)
Gosh i don't know where the time is going at the moment and its already gone mid march!
I have whipped up a super simple creation today using Picknix Vol 1 CD....
I built up all the layered and arranged them in Craft Artist. When i was happy with it i simply printed it out and mounted into onto kraft card. I then added a few gems and a dash of ribbon.
Perfect if you need to create a super fast card :)

Kitty xx

Sunday, 17 March 2013

Inky Fingers at Studio 12

Morning everyone,

JAN here today with a little bit of Studio 12 inspiration.


This gorgeous heart image is one of the cutting files 
in the 'Welcome Home' section of the Picknix 1 CD
But as I don't have a cutting machine, I like to use them as .png images to print. 
I love the solid black outlines, which are great for printing onto an inky background, 
which I made using one of my favourite distress ink colours - Victorian Velvet, 
with a little added spritz of pearl shimmer mist.

For more details pop over to my blog HERE.

Have a great day - Jan xx


Friday, 15 March 2013

Week 11 - Happy Easter

Good morning folks, Friday is here again and we have a new challenge for you.

If you're going to GNPE at Harrogate this weekend make sure you pop by the Polkadoodles stand where there are lots of yummy new goodies on offer including our latest new Digistamp Heaven collection, paper packs and all the new stamps, plus Nikky will be demonstrating the new Graph'It markers and Pan Pastels too - we think she'll be a busy girl at the show!

Before we give you all the details of this week's theme,  we need to announce the winners from the Week 9 challenge - Spring Flowers and you certainly loved this challenge but sadly there can only be 3 winners and here they are:

1st Place - Cass  - you win a Cherryblossom Lane CD and please use the code PD1W1109 to claim your prize
2nd Place - Scrappymax  - you also win a Cherryblossom Lane CD and please use the code PD2W1109
3rd Place - Dreamlaine  - you also win a Cherryblossom Lane CD and please use the code PD3W1109

Congratulations to you all.  Please email Nikky and don't forget to quote your winners code - we cannot release prizes without it! 

We have a few little rules which makes our life a lot easier when we come visiting your blog:

1.  Please follow the challenge theme!
2.  Only enter your creation into a maximum of 10 challenges including Polkadoodles
3.  Please link your blog post and not your blog address with the linky tool - this saves us from searching your blog for your entry
4.  And please, no back-linking to previous posts - these will be disregarded from our top three voting
5.  If you have word verification on your blog it really does slow us down when leaving comments - please consider turning off word verification especially as the comment moderation has a spam section.


Now for the challenge and this week we would like to see your Easter creations - just take a look at all the fabulous goodies the Design Team have cooked up for your inspiration. We have some fab prizes this week too as the first prize winner will receive a Cherryblossom Lane CD and the two runners up a download
! 

Asha - My Easter offering for this week's challenge is made entirely with papers and image from the Cherryblossom Lane CD. Everything in this CD is irresistibly pretty, made extra special by Nikky's flawless colouring. I'm using a pre-coloured image of Maisie. Come summer, you can very easily dress her up in vibrant colours but for spring she'll remain a pastel beauty. To wrap up, I used purple gingham ribbon and 2 purple pearls.


Karon - Thinking cap on for this one, well a little.  The Cherryblossom Lane CD was my perfect choice for this weeks inspiration, as it's full of rabbits!  I chose to use Lily on her bicycle and made her basket a little 3D by printing it out twice, she is coloured with alcohol markers.  I made some little Easter eggs from the same papers that were used for the main backing papers (all from the same CD), and placed these in her basket.  Made a little banner and added some ribbon and a bow to finish her off.


Astrid - I made this Easter card with paper from the  Cherryblossom Lane CD, It's a great CD for papers and images and all the stuff you need for the Spring.
I have used the new image from Fall Love digi, Time for Tea  they are soo cute.
The flowers are from Marianne Design dies and the rest is made by myself. The paper doily and tags are from my stash.


Sally - This is my Easter Card made with an Emma Canning Digi, available from www.polkadoodle.co.uk. I used the bunny image and coloured him with my promarkers. I printed of some backing papers from the Double Sprinkle of Kraft CD cut a frame using a Sizzix die out of kraft card which I had in my crafty stash, punched out some flowers out of the backing papers, added a bow, button and sentiment.


Miria I made an easel card with this lovely new digis from Emma Canning available from Polka Doodles , I coloured the image with Zig Kurecolor, I also used glossy accents for the egg. Papers are from cd Sugarplum Daisy. I just added some washi tape, buttons and pearls.


Alethea - I don't usually make easter cards so found it a bit hard to be creative but finally decided to use this Emma Canning Image - Bunny, which you can get from Polkadoodles. I used an insert from the Cherryblossom Lane CD. I then added some easter eggs which I cropped and resized from the Emma Canning image - Happy Easter,  which is also available from Polka Doodles. I then just added some rhinestones and kindyglitz!!


Fliss - I've made a card with the cute Easter chicks by Emma Canning (aren't they just adorable) and had to hunt through my paper scraps for papers in Spring shades of yellow and green as a certain person home last weekend practically wiped out the coloured ink in my printer! I hit upon the idea of cutting the scraps into strips and hope you like the effect. The papers are from CDs too numerous to mention but it does give you an idea of how well they all go together.


Lidia - I made my card in an Easter egg shape with the Fairy Flutterby stamp Graciein pastel tones and added some flowers from the same stamp set. I cut several out and layered them to give dimension.


How about this for some fabulous inspiration! You have until 12 noon on Sunday 24 March to get your entries in and good luck!

...............................................................................